Upgrade to Microsoft Edge to take advantage of the latest features, security updates, and technical support.
Feedback
Edit
Send welcome message to users
18 minutes to read
Thank you.
APPLIES TO: SDK v4
The primary goal when creating any bot is to engage your user in a meaningful conversation. One of the best ways to achieve this goal is to ensure that from the moment a user first connects, they understand your bot's main purpose and capabilities, the reason your bot was created. This article provides code examples to help you welcome users to your bot.
Prerequisites
Understand bot basics.
A copy of the Welcome user sample in either C# Sample, JS Sample, Java Sample or Python Sample. The code from the sample is used to explain how to send welcome messages.
About this sample code
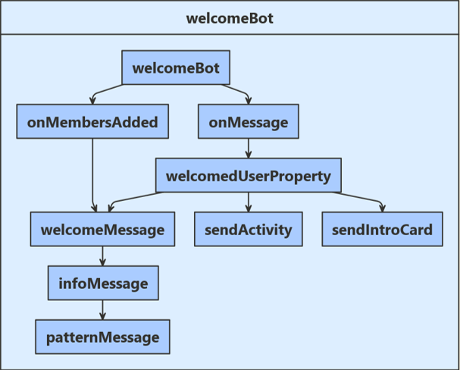
This sample code shows how to detect and welcome new users when they are initially connected to your bot. The following diagram shows the logic flow for this bot.
C#
JavaScript
Java
Python
The two main events encountered by the bot are:
OnMembersAddedAsync which is called whenever a new user is connected to your bot
OnMessageActivityAsync which is called whenever a new user input is received.
Whenever a new user is connected, they are provided with a WelcomeMessage, InfoMessage, and PatternMessage by the bot. When a new user input is received, WelcomeUserState is checked to see if DidBotWelcomeUser is set to true. If not, an initial welcome user message is returned to the user.
The two main events encountered by the bot are:
onMembersAdded which is called whenever a new user is connected to your bot
onMessage which is called whenever a new user input is received.
Whenever a new user is connected, they are provided with a welcomeMessage, infoMessage, and patternMessage by the bot. When a new user input is received, welcomedUserProperty is checked to see if didBotWelcomeUser is set to true. If not, an initial welcome user message is returned to the user. If DidBotWelcomeUser is true, the user's input is evaluated. Based on the content of the user's input this bot will do one of the following:
Echo back a greeting received from the user.
Display a hero card providing addition information about bots.
Resend the WelcomeMessage explaining expected inputs for this bot.
The two main events encountered by the bot are:
onMembersAdded which is called whenever a new user is connected to your bot
onMessageActivity which is called whenever a new user input is received.
Whenever a new user is connected, they are provided with a WELCOME_MESSAGE, INFO_MESSAGE, and PATTERN_MESSAGE by the bot. When a new user input is received, WelcomeUserState is checked to see if getDidBotWelcomeUser() is set to true. If not, an initial welcome user message is returned to the user.
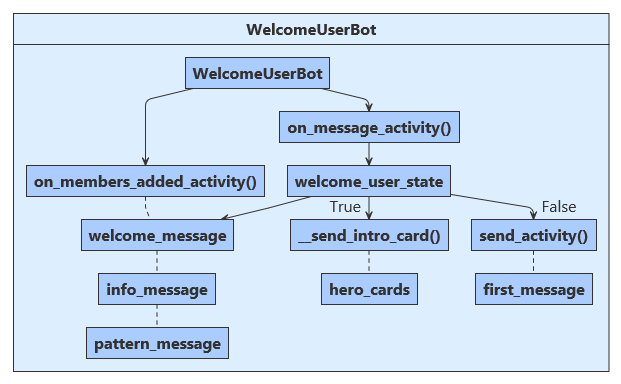
The two main events encountered by the bot are:
on_members_added_activity which is called whenever a new user is connected to your bot
on_message_activity which is called whenever a new user input is received.
Whenever a new user is connected, they are provided with a welcome message, information message, and a pattern message by the bot. When a new user input is received, the welcome_user_state.did_welcome_user property is checked to see if it is set to true. If it is not set to true, an initial welcome user message is returned to the user. If it is set to true, based on the content of the user's input this bot will do one of the following:
Echo back a greeting received from the user.
Display a hero card providing addition information about bots.
Create user state
C#
JavaScript
Java
Python
The user state object is created at startup and dependency injected into the bot constructor.
Startup.cs
// Create the Bot Adapter with error handling enabled. services.AddSingleton<IBotFrameworkHttpAdapter, AdapterWithErrorHandler>(); // Create the storage we'll be using for User and Conversation state. (Memory is great for testing purposes.)
Bots\WelcomeUserBot.cs
private readonly BotState _userState; // Initializes a new instance of the "WelcomeUserBot" class. public WelcomeUserBot(UserState userState) { _userState = userState; }
At startup, user state is defined in index.js and consumed by the bot constructor.
index.js
// For local development, in-memory storage is used. // CAUTION: The Memory Storage used here is for local bot debugging only. When the bot // is restarted, anything stored in memory will be gone. const memoryStorage = new MemoryStorage(); const userState = new UserState(memoryStorage); // Create the main dialog. const bot = new WelcomeBot(userState);
The user state object is created at startup and dependency injected into the bot constructor by the Spring container.
Application.java
@Bean public Bot getBot(UserState userState) { return new WelcomeUserBot(userState); }
WelcomeUserBot.java
private final UserState userState; // Initializes a new instance of the "WelcomeUserBot" class. @Autowired public WelcomeUserBot(UserState withUserState) { userState = withUserState; }
At startup, user state is defined in app.py and consumed by the bot constructor.
We now create a property accessor that provides us a handle to WelcomeUserState inside the OnMessageActivityAsync method. Then call the GetAsync method to get the properly scoped key. We then save user state data after each user input iteration using the SaveChangesAsync method.
Bots\WelcomeUserState.cs
// Gets or sets whether the user has been welcomed in the conversation. public bool DidBotWelcomeUser { get; set; } = false;
Bots\WelcomeUserBot.cs
var welcomeUserStateAccessor = _userState.CreateProperty<WelcomeUserState>(nameof(WelcomeUserState)); var didBotWelcomeUser = await welcomeUserStateAccessor.GetAsync(turnContext, () => new WelcomeUserState(), cancellationToken);
// Save any state changes. await _userState.SaveChangesAsync(turnContext, cancellationToken: cancellationToken);
We now create a property accessor that provides us a handle to welcomedUserProperty which is persisted within userState.
this.onMessage(async (context, next) => { // Read UserState. If the 'DidBotWelcomedUser' does not exist (first time ever for a user) // set the default to false. const didBotWelcomedUser = await this.welcomedUserProperty.get(context, false);
/** * Override the ActivityHandler.run() method to save state changes after the bot logic completes. */ async run(context) { await super.run(context); // Save state changes await this.userState.saveChanges(context); }
We now create a property accessor that provides us a handle to WelcomeUserState inside the onMessageActivity method. Then call the get method to get the properly scoped key. We then save user state data after each user input iteration using the saveChanges method.
WelcomeUserBot.java
// Get state data from UserState. StatePropertyAccessor<WelcomeUserState> stateAccessor = userState.createProperty("WelcomeUserState"); CompletableFuture<WelcomeUserState> stateFuture = stateAccessor.get(turnContext, WelcomeUserState::new);
It uses the property accessor in the on_message_activity handler and overrides the on_turn handler to save state before the end of the turn.
# Get the state properties from the turn context. welcome_user_state = await self.user_state_accessor.get( turn_context, WelcomeUserState )
async def on_turn(self, turn_context: TurnContext): await super().on_turn(turn_context) # save changes to WelcomeUserState after each turn await self._user_state.save_changes(turn_context)
Detect and greet newly connected users
C#
JavaScript
Java
Python
In WelcomeUserBot, we check for an activity update using OnMembersAddedAsync() to see if a new user has been added to the conversation and then send them a set of three initial welcome messages WelcomeMessage, InfoMessage and PatternMessage. Complete code for this interaction is shown below.
Bots\WelcomeUserBot.cs
public class WelcomeUserBot : ActivityHandler { // Messages sent to the user. private const string WelcomeMessage = "This is a simple Welcome Bot sample. This bot will introduce you " + "to welcoming and greeting users. You can say 'intro' to see the " + "introduction card. If you are running this bot in the Bot Framework " + "Emulator, press the 'Start Over' button to simulate user joining " + "a bot or a channel"; private const string InfoMessage = "You are seeing this message because the bot received at least one " + "'ConversationUpdate' event, indicating you (and possibly others) " + "joined the conversation. If you are using the emulator, pressing " + "the 'Start Over' button to trigger this event again. The specifics " + "of the 'ConversationUpdate' event depends on the channel. You can " + "read more information at: " + "https://aka.ms/about-botframework-welcome-user"; private const string LocaleMessage = "You can use the activity's 'GetLocale()' method to welcome the user " + "using the locale received from the channel. " + "If you are using the Emulator, you can set this value in Settings.";
protected override async Task OnMembersAddedAsync(IList<ChannelAccount> membersAdded, ITurnContext<IConversationUpdateActivity> turnContext, CancellationToken cancellationToken) { foreach (var member in membersAdded) { if (member.Id != turnContext.Activity.Recipient.Id) { await turnContext.SendActivityAsync($"Hi there - {member.Name}. {WelcomeMessage}", cancellationToken: cancellationToken); await turnContext.SendActivityAsync(InfoMessage, cancellationToken: cancellationToken); await turnContext.SendActivityAsync($"{LocaleMessage} Current locale is '{turnContext.Activity.GetLocale()}'.", cancellationToken: cancellationToken); await turnContext.SendActivityAsync(PatternMessage, cancellationToken: cancellationToken); } } }
This JavaScript code sends initial welcome messages when a user is added. This is done by checking the conversation activity and verifying that a new member was added to the conversation.
bots/welcomeBot.js
// Sends welcome messages to conversation members when they join the conversation. // Messages are only sent to conversation members who aren't the bot. this.onMembersAdded(async (context, next) => { // Iterate over all new members added to the conversation for (const idx in context.activity.membersAdded) { // Greet anyone that was not the target (recipient) of this message. // Since the bot is the recipient for events from the channel, // context.activity.membersAdded === context.activity.recipient.Id indicates the // bot was added to the conversation, and the opposite indicates this is a user. if (context.activity.membersAdded[idx].id !== context.activity.recipient.id) { await context.sendActivity(`Welcome to the 'Welcome User' Bot. This bot will introduce you to welcoming and greeting users.`); await context.sendActivity(`You are seeing this message because the bot received at least one 'ConversationUpdate' ` + `event, indicating you (and possibly others) joined the conversation. If you are using the emulator, ` + `pressing the 'Start Over' button to trigger this event again. The specifics of the 'ConversationUpdate' ` + `event depends on the channel. You can read more information at https://aka.ms/about-botframework-welcome-user`); await context.sendActivity(`You can use the activity's 'locale' property to welcome the user ` + `using the locale received from the channel. ` + `If you are using the Emulator, you can set this value in Settings. ` + `Current locale is '${ context.activity.locale }'`); await context.sendActivity(`It is a good pattern to use this event to send general greeting to user, explaining what your bot can do. ` + `In this example, the bot handles 'hello', 'hi', 'help' and 'intro'. ` + `Try it now, type 'hi'`); } } // By calling next() you ensure that the next BotHandler is run. await next(); });
In WelcomeUserBot, we check for an activity update using onMembersAdded() to see if a new user has been added to the conversation and then send them a set of three initial welcome messages WELCOME_MESSAGE, INFO_MESSAGE and PATTERN_MESSAGE. Complete code for this interaction is shown below.
WelcomeUserBot.java
public class WelcomeUserBot extends ActivityHandler { // Messages sent to the user. private static final String WELCOME_MESSAGE = "This is a simple Welcome Bot sample. This bot will introduce you " + "to welcoming and greeting users. You can say 'intro' to see the " + "introduction card. If you are running this bot in the Bot Framework " + "Emulator, press the 'Start Over' button to simulate user joining " + "a bot or a channel"; private static final String INFO_MESSAGE = "You are seeing this message because the bot received at least one " + "'ConversationUpdate' event, indicating you (and possibly others) " + "joined the conversation. If you are using the emulator, pressing " + "the 'Start Over' button to trigger this event again. The specifics " + "of the 'ConversationUpdate' event depends on the channel. You can " + "read more information at: " + "https://aka.ms/about-botframework-welcome-user"; private String localeMessage = "You can use the activity's GetLocale() method to welcome the user " + "using the locale received from the channel. " + "If you are using the Emulator, you can set this value in Settings."; private static final String PATTERN_MESSAGE = "It is a good pattern to use this event to send general greeting" + "to user, explaining what your bot can do. In this example, the bot " + "handles 'hello', 'hi', 'help' and 'intro'. Try it now, type 'hi'";
The on_members_added_activity checks to see if a new user has been added and then sends three initial welcome messages: a welcome message, an information message and a pattern message.
bots/welcome-user-bot.py
""" Greet when users are added to the conversation. Note that all channels do not send the conversation update activity. If you find that this bot works in the emulator, but does not in another channel the reason is most likely that the channel does not send this activity. """ for member in members_added: if member.id != turn_context.activity.recipient.id: await turn_context.send_activity( f"Hi there { member.name }. " + self.WELCOME_MESSAGE ) await turn_context.send_activity(self.INFO_MESSAGE) await turn_context.send_activity( f"{ self.LOCALE_MESSAGE } Current locale is { turn_context.activity.locale }." ) await turn_context.send_activity(self.PATTERN_MESSAGE)
Welcome new user and discard initial input
C#
JavaScript
Java
Python
It is also important to consider when your user's input might actually contain useful information, and this may vary for each channel. To ensure your user has a good experience on all possible channels, we check the status flag didBotWelcomeUser and if this is "false", we do not process the initial user input. We instead provide the user with an initial welcome message. The bool welcomedUserProperty is then set to "true", stored in UserState and our code will now process this user's input from all additional message activities.
Bots\WelcomeUserBot.cs
protected override async Task OnMessageActivityAsync(ITurnContext<IMessageActivity> turnContext, CancellationToken cancellationToken) { var welcomeUserStateAccessor = _userState.CreateProperty<WelcomeUserState>(nameof(WelcomeUserState)); var didBotWelcomeUser = await welcomeUserStateAccessor.GetAsync(turnContext, () => new WelcomeUserState(), cancellationToken); if (didBotWelcomeUser.DidBotWelcomeUser == false) { didBotWelcomeUser.DidBotWelcomeUser = true; // the channel should sends the user name in the 'From' object var userName = turnContext.Activity.From.Name; await turnContext.SendActivityAsync("You are seeing this message because this was your first message ever to this bot.", cancellationToken: cancellationToken); await turnContext.SendActivityAsync($"It is a good practice to welcome the user and provide personal greeting. For example, welcome {userName}.", cancellationToken: cancellationToken); }
// Save any state changes. await _userState.SaveChangesAsync(turnContext, cancellationToken: cancellationToken);
It is also important to consider when your user's input might actually contain useful information, and this may vary for each channel. To ensure your user has a good experience on all possible channels, we check the didBotWelcomedUser property, if it does not exist, we set it to "false" and do not process the initial user input. We instead provide the user with an initial welcome message. The bool didBotWelcomeUser is then set to "true" and our code processes the user input from all additional message activities.
bots/welcomeBot.js
this.onMessage(async (context, next) => { // Read UserState. If the 'DidBotWelcomedUser' does not exist (first time ever for a user) // set the default to false. const didBotWelcomedUser = await this.welcomedUserProperty.get(context, false); // Your bot should proactively send a welcome message to a personal chat the first time // (and only the first time) a user initiates a personal chat with your bot. if (didBotWelcomedUser === false) { // The channel should send the user name in the 'From' object const userName = context.activity.from.name; await context.sendActivity('You are seeing this message because this was your first message ever sent to this bot.'); await context.sendActivity(`It is a good practice to welcome the user and provide personal greeting. For example, welcome ${ userName }.`); // Set the flag indicating the bot handled the user's first message. await this.welcomedUserProperty.set(context, true); } else {
} // By calling next() you ensure that the next BotHandler is run. await next(); });
It is important to consider when your user's input might contain useful information, which may vary for each channel. To ensure your user has a good experience on all possible channels, we check the status flag getDidBotWelcomeUser and if this is "false", we do not process the initial user input. We instead provide the user with an initial welcome message. The bool setDidBotWelcomeUser is then set to "true", stored in UserState and our code will now process this user's input from all additional message activities.
WelcomeUserBot.java
@Override protected CompletableFuture<Void> onMessageActivity(TurnContext turnContext) { // Get state data from UserState. StatePropertyAccessor<WelcomeUserState> stateAccessor = userState.createProperty("WelcomeUserState"); CompletableFuture<WelcomeUserState> stateFuture = stateAccessor.get(turnContext, WelcomeUserState::new); return stateFuture.thenApply(thisUserState -> { if (!thisUserState.getDidBotWelcomeUser()) { thisUserState.setDidBotWelcomeUser(true); // the channel should send the user name in the 'from' object String userName = turnContext.getActivity().getFrom().getName(); return turnContext .sendActivities( MessageFactory.text(FIRST_WELCOME_ONE), MessageFactory.text(String.format(FIRST_WELCOME_TWO, userName)) );
// Save any state changes. .thenApply(response -> userState.saveChanges(turnContext))
It is also important to consider when the user's input might actually contain useful information, this may vary for each channel. To ensure the user has a good experience on all possible channels, on_message_activity checks the did_welcome_user property. The first time, it sets it to false and does not process the user input. Instead, it provides the user with an initial welcome message. Then it sets did_welcome_user to true and processes the user input from all additional message activities.
bots/welcome-user-bot.py
if not welcome_user_state.did_welcome_user: welcome_user_state.did_welcome_user = True await turn_context.send_activity( "You are seeing this message because this was your first message ever to this bot." ) name = turn_context.activity.from_property.name await turn_context.send_activity( f"It is a good practice to welcome the user and provide personal greeting. For example: Welcome {name}" )
Process additional input
Once a new user has been welcomed, user input information is evaluated for each message turn and the bot provides a response based on the context of that user input. The following code shows the decision logic used to generate that response.
C#
JavaScript
Java
Python
An input of 'intro' or 'help' calls the function SendIntroCardAsync to present the user with an informational hero card. That code is examined in the next section of this article.
Bots\WelcomeUserBot.cs
var text = turnContext.Activity.Text.ToLowerInvariant(); switch (text) { case "hello": case "hi": await turnContext.SendActivityAsync($"You said {text}.", cancellationToken: cancellationToken); break; case "intro": case "help": await SendIntroCardAsync(turnContext, cancellationToken); break; default: await turnContext.SendActivityAsync(WelcomeMessage, cancellationToken: cancellationToken); break; }
An input of 'intro' or 'help' uses CardFactory to present the user with an Intro Adaptive Card. That code is examined in the next section of this article.
bots/welcomeBot.js
// This example uses an exact match on user's input utterance. // Consider using LUIS or QnA for Natural Language Processing. const text = context.activity.text.toLowerCase(); switch (text) { case 'hello': case 'hi': await context.sendActivity(`You said "${ context.activity.text }"`); break; case 'intro': case 'help': await this.sendIntroCard(context); break; default: await context.sendActivity(`This is a simple Welcome Bot sample. You can say 'intro' to see the introduction card. If you are running this bot in the Bot Framework Emulator, press the 'Start Over' button to simulate user joining a bot or a channel`); }
An input of 'intro' or 'help' calls the function sendIntroCard to present the user with an informational hero card. That code is examined in the next section of this article.
WelcomeUserBot.java
// This example hardcodes specific utterances. // You should use LUIS or QnA for more advance language understanding. String text = turnContext.getActivity().getText().toLowerCase(); switch (text) { case "hello": case "hi": return turnContext.sendActivities(MessageFactory.text("You said " + text)); case "intro": case "help": return sendIntroCard(turnContext); default: return turnContext.sendActivity(WELCOME_MESSAGE); }
An user's input of intro or help causes the bot to call __send_intro_card which presents the user with an intro adaptive card.
bots/welcome-user-bot.py
if text in ("hello", "hi"): await turn_context.send_activity(f"You said { text }") elif text in ("intro", "help"): await self.__send_intro_card(turn_context) else: await turn_context.send_activity(self.WELCOME_MESSAGE)
Using hero card greeting
As mentioned above, some user inputs generate a Hero Card in response to their request. You can learn more about hero card greetings here Send an Intro Card. Below is the code required to create this bot's hero card response.
C#
JavaScript
Java
Python
Bots\WelcomeUserBot.cs
private static async Task SendIntroCardAsync(ITurnContext turnContext, CancellationToken cancellationToken) { var card = new HeroCard { Title = "Welcome to Bot Framework!", Text = @"Welcome to Welcome Users bot sample! This Introduction card is a great way to introduce your Bot to the user and suggest some things to get them started. We use this opportunity to recommend a few next steps for learning more creating and deploying bots.", Images = new List<CardImage>() { new CardImage("https://aka.ms/bf-welcome-card-image") }, Buttons = new List<CardAction>() { new CardAction(ActionTypes.OpenUrl, "Get an overview", null, "Get an overview", "Get an overview", "https://docs.microsoft.com/en-us/azure/bot-service/?view=azure-bot-service-4.0"), new CardAction(ActionTypes.OpenUrl, "Ask a question", null, "Ask a question", "Ask a question", "https://stackoverflow.com/questions/tagged/botframework"), new CardAction(ActionTypes.OpenUrl, "Learn how to deploy", null, "Learn how to deploy", "Learn how to deploy", "https://docs.microsoft.com/en-us/azure/bot-service/bot-builder-howto-deploy-azure?view=azure-bot-service-4.0"), } }; var response = MessageFactory.Attachment(card.ToAttachment()); await turnContext.SendActivityAsync(response, cancellationToken); }
bots/welcomeBot.js
async sendIntroCard(context) { const card = CardFactory.heroCard( 'Welcome to Bot Framework!', 'Welcome to Welcome Users bot sample! This Introduction card is a great way to introduce your Bot to the user and suggest some things to get them started. We use this opportunity to recommend a few next steps for learning more creating and deploying bots.', ['https://aka.ms/bf-welcome-card-image'], [ { type: ActionTypes.OpenUrl, title: 'Get an overview', value: 'https://docs.microsoft.com/en-us/azure/bot-service/?view=azure-bot-service-4.0' }, { type: ActionTypes.OpenUrl, title: 'Ask a question', value: 'https://stackoverflow.com/questions/tagged/botframework' }, { type: ActionTypes.OpenUrl, title: 'Learn how to deploy', value: 'https://docs.microsoft.com/en-us/azure/bot-service/bot-builder-howto-deploy-azure?view=azure-bot-service-4.0' } ] ); await context.sendActivity({ attachments: [card] }); }
WelcomeUserBot.java
private CompletableFuture<ResourceResponse> sendIntroCard(TurnContext turnContext) { HeroCard card = new HeroCard(); card.setTitle("Welcome to Bot Framework!"); card.setText( "Welcome to Welcome Users bot sample! This Introduction card " + "is a great way to introduce your Bot to the user and suggest " + "some things to get them started. We use this opportunity to " + "recommend a few next steps for learning more creating and deploying bots." ); CardImage image = new CardImage(); image.setUrl("https://aka.ms/bf-welcome-card-image"); card.setImages(Collections.singletonList(image)); CardAction overviewAction = new CardAction(); overviewAction.setType(ActionTypes.OPEN_URL); overviewAction.setTitle("Get an overview"); overviewAction.setText("Get an overview"); overviewAction.setDisplayText("Get an overview"); overviewAction.setValue( "https://docs.microsoft.com/en-us/azure/bot-service/?view=azure-bot-service-4.0" ); CardAction questionAction = new CardAction(); questionAction.setType(ActionTypes.OPEN_URL); questionAction.setTitle("Ask a question"); questionAction.setText("Ask a question"); questionAction.setDisplayText("Ask a question"); questionAction.setValue("https://stackoverflow.com/questions/tagged/botframework"); CardAction deployAction = new CardAction(); deployAction.setType(ActionTypes.OPEN_URL); deployAction.setTitle("Learn how to deploy"); deployAction.setText("Learn how to deploy"); deployAction.setDisplayText("Learn how to deploy"); deployAction.setValue( "https://docs.microsoft.com/en-us/azure/bot-service/bot-builder-howto-deploy-azure?view=azure-bot-service-4.0" ); card.setButtons(Arrays.asList(overviewAction, questionAction, deployAction)); Activity response = MessageFactory.attachment(card.toAttachment()); return turnContext.sendActivity(response); }
bots/welcome-user-bot.py
async def __send_intro_card(self, turn_context: TurnContext): card = HeroCard( title="Welcome to Bot Framework!", text="Welcome to Welcome Users bot sample! This Introduction card " "is a great way to introduce your Bot to the user and suggest " "some things to get them started. We use this opportunity to " "recommend a few next steps for learning more creating and deploying bots.", images=[CardImage(url="https://aka.ms/bf-welcome-card-image")], buttons=[ CardAction( type=ActionTypes.open_url, title="Get an overview", text="Get an overview", display_text="Get an overview", value="https://docs.microsoft.com/en-us/azure/bot-service/?view=azure-bot-service-4.0", ), CardAction( type=ActionTypes.open_url, title="Ask a question", text="Ask a question", display_text="Ask a question", value="https://stackoverflow.com/questions/tagged/botframework", ), CardAction( type=ActionTypes.open_url, title="Learn how to deploy", text="Learn how to deploy", display_text="Learn how to deploy", value="https://docs.microsoft.com/en-us/azure/bot-service/bot-builder-howto-deploy-azure?view=azure-bot-service-4.0", ), ], ) return await turn_context.send_activity( MessageFactory.attachment(CardFactory.hero_card(card)) )
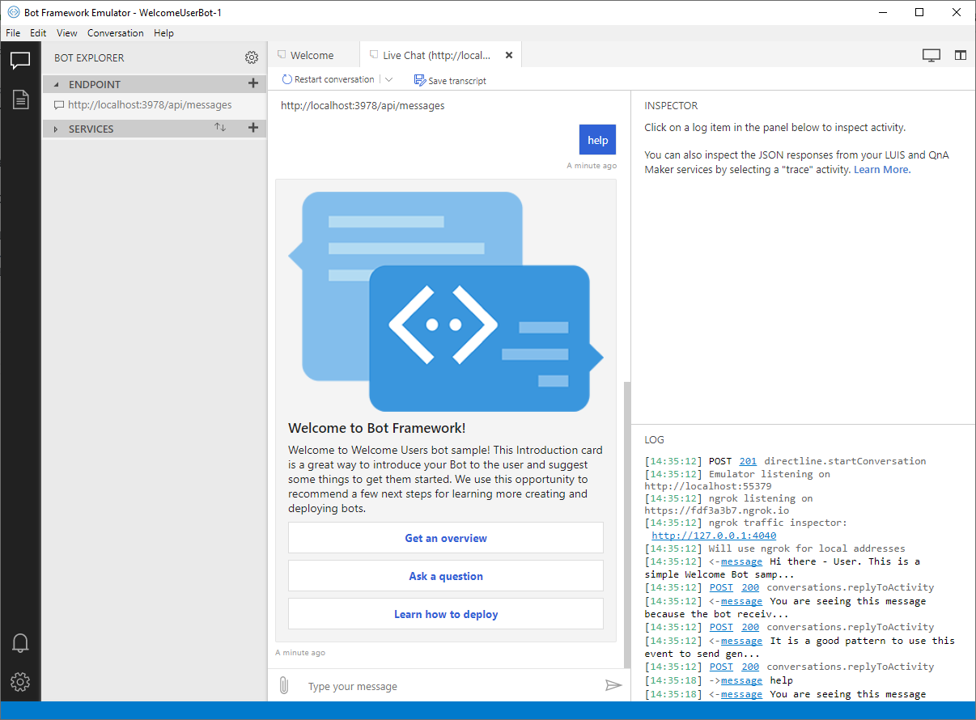
Test the bot
Download and install the latest Bot Framework Emulator
Run the sample locally on your machine. If you need instructions, refer to the README file for C# Sample or JS Sample.
Use the Emulator to test the bot as shown below.
Test hero card greeting.
Additional Resources
Learn more about various media responses in Add media to messages.


0 Response to "How To Create Welcome Message In Telegram"
Post a Comment